Sunday, December 13, 2015

Setting Up Raspberry Pi

Preface

Cool, I've tried Arduino, BeagleBone, and STM boards before, but this would be my first experience in coding on Raspberry Pi, which quite famous and cheap as well. In this post, I would write down my steps for setting up Raspbian, a Linux distribution designed for Raspberry Pi. Although there are already tons of tutorial regarding to this, I will include some troubleshooting as well.

Equipments

  1. Raspberry Pi Model B
  2. HDMI Cable
  3. Monitor supports HDMI
  4. MicroSD Card (at least 8G)
  5. USB Keyboard / USB Mouse
  6. USB wireless adapter - Edimax EW-7811UN
  7. USB Cable (A type to Micro)

Steps

Build OS Image on SD Card

Normally, this step should be easy, only one or two commands are needed to get a SD with our OS in it. However, I found a problem while doing this step this time - my SD card is in read-only mode. Usually, this is cause by the physical lock switch on the card; however, no matter I switch it on or off, it's always locked. By applying the commands I noted in the last post, we can learn its details:
> diskutil info disk2
   Device Identifier:        disk2
   Device Node:              /dev/disk2
   Whole:                    Yes
   Part of Whole:            disk2
   Device / Media Name:      SD Card Reader
   Volume Name:              Not applicable (no file system)
   Mounted:                  Not applicable (no file system)
   File System:              None
   Content (IOContent):      FDisk_partition_scheme
   OS Can Be Installed:      No
   Media Type:               Generic
   Protocol:                 USB
   SMART Status:             Not Supported
   Total Size:               15.9 GB (15931539456 Bytes) (exactly 31116288 512-Byte-Units)
   Volume Free Space:        Not applicable (no file system)
   Device Block Size:        512 Bytes
   Read-Only Media:          Yes
   Read-Only Volume:         Not applicable (no file system)
   Device Location:          Internal
   Removable Media:          Yes
   Media Removal:            Software-Activated
   Virtual:                  No
   OS 9 Drivers:             No
   Low Level Format:         Not supported

And, whenever I tried to format or write onto the card, I got:

> sudo -s -- 'dd bs=1m if=/dev/zero of=/dev/disk2'
Password:
dd: /dev/disk2: Permission denied

After several trials and Googling, I found the problem is caused by the adaptor that adapts the small Micro SD back to the normal size where its switch isn't functioning well. Funny discussion regarding to this issue can be found online, such as "it worked when it was about 75% towards the unlocked position, but you might need to fiddle with it a bit". No matter how I place the switch lock, it never works.

So, I then brought a small Micro SD Card Reader, which costs around USD2.5, and it fixes all the problem nicely.

> diskutil info disk3
   Device Identifier:        disk3
   Device Node:              /dev/disk3
   Whole:                    Yes
   Part of Whole:            disk3
   Device / Media Name:      STORAGE DEVICE
   Volume Name:              Not applicable (no file system)
   Mounted:                  Not applicable (no file system)
   File System:              None
   Content (IOContent):      FDisk_partition_scheme
   OS Can Be Installed:      No
   Media Type:               Generic
   Protocol:                 USB
   SMART Status:             Not Supported
   Total Size:               15.9 GB (15931539456 Bytes) (exactly 31116288 512-Byte-Units)
   Volume Free Space:        Not applicable (no file system)
   Device Block Size:        512 Bytes
   Read-Only Media:          No
   Read-Only Volume:         Not applicable (no file system)
   Device Location:          External
   Removable Media:          Yes
   Media Removal:            Software-Activated
   Virtual:                  No
   OS 9 Drivers:             No
   Low Level Format:         Not supported
~
> diskutil unmountDisk /dev/disk3
Unmount of all volumes on disk3 was successful
~
> sudo -s -- 'dd bs=1m if=/Users/heron/Desktop/2015-11-21-raspbian-jessie-lite.img | pv | dd of=/dev/disk3'
I am using pv in the middle instead of barely using dd is because that dd doesn't show the process bar, which is hard for me to know how long will it take, and how much is done.

Power Up

Basically, the followings would be easy and we are already about to finish. Plug in the cables as below, and it will power up right after the micro USB is plugged in.


From the photo, one can see that I have:
  • 1 Micro USB for power
  • 1 HDMI for display
  • 2 Logitech Unifying Receiver for keyboard and mouse
  • 1 USB wireless adapter for Wifi
  • 1 USB microphone (for application purpose)

Keyboard Layout Issue

Everything should be set so far, and if you're using NOOBS system installer, it will do rest of the jobs. The only thing is you have to do is to select your settings or system you wish to install.

However, there's one issue I found when I just setup Raspbian, the operating system designed for Raspberry Pi based on Debian. It's using different keyboard layout which is a general one that I used to. So, to fix the problem, we have to fire up keyboard-configuration and pick the right setting. Steps are in this link. The settings will start to affect only after reboot.

Reference

Saturday, December 12, 2015

Convert GIF Background from Transparency to a Solid Color

Preface

Last day, I got a new Pebble watch, then I started to code something on it. Within one day, I've tried out its dictation API with a small but fun app. Also, I wrote a watchface which has a circle progress bar showing the percentage of the time had past today (the idea is from one of Apple Watch watchface, "Solar").

However, when I was trying to put the animation on my watchface, it requires an "Animated Portable Network Graphics (APNG) file format" with solid color background. Therefore, I have to somehow find a way to convert one GIF file I have into that format while my GIF file is having a transparent background.

Steps

"Convert" written by ImageMagick is a powerful tool in this situation, I've been using it from the first year I started to use unix-like systems. To install (for Mac):
> sudo port install ImageMagick
To fill solid background (I use black here) on my GIF file:
> convert input.gif -background black -alpha remove result.gif
where option background sets the color of background, and option alpha is set to "remove" for removing its transparency.

And, to convert GIT file into APNG file, we can use a tool called gif2apng. It can be downloaded here. How I use it is written below:
> unzip gif2apng-1.9-bin-macosx.zip
> cp gif2apng ~/bin
> export PATH=~/bin:$PATH # this depends on the setting you prefer, I like to put this kind of tool under ~/bin
> gif2apng result.gif result.png

gif2apng 1.9 using 7ZIP with 15 iterations

Reading 'result.gif'...
9 frames.
Writing 'result.png'...
9 frames.

More

One to step to go in order to fit into the Pebble Watch, which may be a little irrelevant to this post. I have to crop the image since it's too big. And, what I wanted to do is to remove the upper part. It's originally at size of 100 * 120, and I would like it became 100 * 100. So, there's the magic:
> convert input.gif -coalesce -repage 0x0 -crop 100x100+0+20 +repage result.gif
Finally, we can combine all together as below:
> convert input.gif -coalesce -repage 0x0 -crop 100x100+0+20 +repage -background black -alpha remove result.gif; gif2apng result.gif input.png

Sunday, October 11, 2015

USB Formatting to Support Windows using Mac Command Line Tool

Abstract

It's an annoying problem that Windows isn't support much filesystem formats; thus, usually we meet problems when we plug our USB flash disk, which was formatted by Mac, into Windows machines. Although it seems that this can be solved easily by formatting the disk again to FAT or exFAT, still different problems will exist, such as different version of Windows supporting different types of filesystem, etc.

Anyway, I am writing this post to record how I solved this problem efficiently, so it may help someone or myself in the future.

Steps

A. Locate disk identifier

> diskutil list
...
/dev/disk4 (external, physical):
   #:                       TYPE NAME                    SIZE       IDENTIFIER
   0:     FDisk_partition_scheme                        *8.0 GB     disk4
   1:                 DOS_FAT_32 HERON                   8.0 GB     disk4s1

B. Check Status

If you want to read the information about the disk:
> diskutil info disk4
   Device Identifier:        disk4
   Device Node:              /dev/disk4
   Whole:                    Yes
   Part of Whole:            disk4
   Device / Media Name:      SanDisk Cruzer Fit Media
   Volume Name:              Not applicable (no file system)
   Mounted:                  Not applicable (no file system)
   File System:              None
   Content (IOContent):      FDisk_partition_scheme
   OS Can Be Installed:      No
   Media Type:               Generic
   Protocol:                 USB
   SMART Status:             Not Supported
   Total Size:               8.0 GB (8004304896 Bytes) (exactly 15633408 512-Byte-Units)
   Volume Free Space:        Not applicable (no file system)
   Device Block Size:        512 Bytes
   Read-Only Media:          No
   Read-Only Volume:         Not applicable (no file system)
   Device Location:          External
   Removable Media:          Yes
   Media Removal:            Software-Activated
   Virtual:                  No
   OS 9 Drivers:             No
   Low Level Format:         Not supported

C. Verify Volumes

If you want to verify if there's any issue of the current disk:
> diskutil verifyVolume /Volumes/HERON
Started file system verification on disk4s1 HERON
Verifying file system
** /dev/rdisk4s1
** Phase 1 - Preparing FAT
** Phase 2 - Checking Directories
** Phase 3 - Checking for Orphan Clusters
79 files, 7800596 KiB free (1950149 clusters)
File system check exit code is 0
Finished file system verification on disk4s1 HERON

D. Repairing Volumes

If you found any problem and want to repair the disk:
> diskutil repairVolume /Volumes/HERON
Started file system repair on disk4s1 HERON
Repairing file system
** /dev/rdisk4s1
** Phase 1 - Preparing FAT
** Phase 2 - Checking Directories
** Phase 3 - Checking for Orphan Clusters
77 files, 7800608 KiB free (1950152 clusters)
File system check exit code is 0
Updating boot support partitions for the volume as required
Finished file system repair on disk4s1 HERON

E. Format

To format the disk in order to support Windows' FAT:
> diskutil eraseDisk MS-DOS HERON_2 /dev/disk4
Started erase on disk4
Unmounting disk
Creating the partition map
Waiting for the disks to reappear
Formatting disk4s2 as MS-DOS (FAT) with name HERON_2
512 bytes per physical sector
/dev/rdisk4s2: 15191032 sectors in 1898879 FAT32 clusters (4096 bytes/cluster)
bps=512 spc=8 res=32 nft=2 mid=0xf8 spt=32 hds=255 hid=411648 drv=0x80 bsec=15220736 bspf=14836 rdcl=2 infs=1 bkbs=6
Mounting disk
Finished erase on disk4
To learn filesystems that supported by diskutil:
> diskutil listFilesystems
Formattable file systems
These file system personalities can be used for erasing and partitioning.
When specifying a personality as a parameter to a verb, case is not considered.
Certain common aliases (also case-insensitive) are listed below as well.
-------------------------------------------------------------------------------
PERSONALITY                     USER VISIBLE NAME
-------------------------------------------------------------------------------
ExFAT                           ExFAT
Free Space                      Free Space
  (or) free
MS-DOS                          MS-DOS (FAT)
MS-DOS FAT12                    MS-DOS (FAT12)
MS-DOS FAT16                    MS-DOS (FAT16)
MS-DOS FAT32                    MS-DOS (FAT32)
  (or) fat32
HFS+                            Mac OS Extended
Case-sensitive HFS+             Mac OS Extended (Case-sensitive)
  (or) hfsx
Case-sensitive Journaled HFS+   Mac OS Extended (Case-sensitive, Journaled)
  (or) jhfsx
Journaled HFS+                  Mac OS Extended (Journaled)
  (or) jhfs+
If you are using GUI disk utility, make sure you picked "Master Boot Record":


Just in case that you found unable to unmount volume error, make sure you're not in volume folder when diskutil is trying to umount:

/Volumes/HERON_2
> diskutil verifyVolume /Volumes/HERON
Unable to find disk for /Volumes/HERON
/Volumes/HERON_2
> diskutil verifyVolume /Volumes/HERON_2
Started file system verification on disk4s2 HERON_2
Error: -69673: Unable to unmount volume for repair
/Volumes/HERON_2
> diskutil verifyVolume /Volumes/HERON_2
/Volumes/HERON_2
> cd ..
/Volumes
> diskutil verifyVolume /Volumes/HERON_2
Started file system verification on disk4s2 HERON_2
Verifying file system
** /dev/rdisk4s2
** Phase 1 - Preparing FAT
** Phase 2 - Checking Directories
** Phase 3 - Checking for Orphan Clusters
83 files, 7594648 KiB free (1898662 clusters)
File system check exit code is 0
Finished file system verification on disk4s2 HERON_2

Reference

Friday, September 4, 2015

Adobe Reader DC Update - Network Security Importance

Preface

Today, people in MOI put quite a lot of effect on updating Adobe Reader DC to the latest version. And, in this post, I would like to discuss the importance of updating software like this from security viewpoint, as well as the methods we can apply to update softwares for a bunch of computers efficiently.

Adobe Reader DC Update - Introduction

To discuss the importance of the update, we first have to find out what's new in the latest update (take 15.008.20082 planned update as example here). Then, we look into the security part (ignore the new features, bugs, etc), and take version 2015.007.20033 as affected version where we can get a list of CVE numbers.

Adobe listed out all the security issues (Common Vulnerabilities and Exposures, CVE) that affects to certain version of their Reader DC software, which look like: CVE-2014-0566, CVE-2014-8450, CVE-2015-3095, CVE-2015-4435, CVE-2015-4438, CVE-2015-4441, CVE-2015-4443, ... etc.

Each CVS indicates one security problem. For example, CVE-2014-0566 causes memory corruption vulnerabilities that could lead to code execution, CVE-2014-8450 causes security bypass vulnerabilities that could lead to information disclosure, etc. Any of these CVSs may be a huge security issue that may cause hackers to execute programs without permission.

Adobe Reader DC Update - Methods

For sure, the most basic solution is to check "Check for Updates" in Adobe Reader. However, here I would like to discuss the methods applied by IT administrators which applies updates onto multiple computers in the same time. (Although I am not familiar with Windows enough, I am discussion the things in Windows environment since that's the environment I am facing recently.)

Method 1 - AIP-GPO

AIP-GPO stands for Administrative Install Point deployed via Group Policy Objects. So, it should be divided into two parts for discussion.

AIP is a special directory created by extracting the contents of a self-contained MSI-file into a previously empty directory with the command 'msiexec /a' (applies the administrative installation option). For msp patch files, you have to run 'msiexec /p' later on to attach onto the just-applied msi file.

GPO are used to distribute settings to windows PCs that are members of a domain from a windows server. After the initial setups for GPO, you can simply select the AIP folder and apply the change. Users under a GPO policy will now get the latest update after the group policy refreshes and a computer restart.

* Without a real hands-on operation of AIP-GPO, I am not sure how does GPO find AIP folders, and how good is this solution.

Method 2 - Bootstrapper

Any setup.exe or any other executable that installs updates and launches the MSI installer is a Bootstrapper. Under Adobe's document, we can learn the following benefits of using Bootstrapper:
  • Detects whether the required Windows Installer (MSI) is available and installs it if it isn’t.
  • Detects whether the product is already installed and only proceeds if it does not exist on the target machine.
  • Provides binary installations where the entire installer is supplied and run by each machine.
  • Provides a simple way to chain updates in the required order by simply adding the msp to the installer folder and modifying Setup.ini to apply that patch.
  • It is not subject to the patch constraint that limits an AIP from installing a quarterly update over a out of cycle patch. Thus, installs can always have the latest update without starting over.
So, for our purpose, we can simply add the msp file to the installer folder and modify Setup.ini to apply the latest Adobe Reader update.

* Without having enough information, I am not sure how this solution applies to multiple machines in the same time. So far, I assume bootstrapper should be a way to install/manage updates via command line; therefore, I think, to distribute the updates onto multiple machines, we have to distribute the msp file first, then run setup.exe on each machine remotely.

Method 3 - SCUP/SCCM

"System Center Updates Publisher (SCUP) is a stand-alone tool that is used in conjunction with Microsoft’s System Center Configuration Manager (CM hereafter) to allow administrators to more accurately and efficiently install and update software. Together, CM and SCUP are Microsoft’s latest change and configuration management solution that replaces older methodologies such as SMS and GPO. Unlike those technologies, CM provides features such as metering, asset intelligence, and improved remote client administration. For example, CM users can easily determine what products versions are installed including all dot and double dot patches without having to write a complicated query." - Adobe.com

Simply to say, SCUP/SCCM is a newer solution came up after the previous two solutions. SCUP is a catelog file, CM is the way to publish/manage the updates. However, since it's a newer solution, it only works on 10.x and later Adobe products.

Summary

From the documentation and the software updates, we can learn that Adobe is caring about the security issue nicely. They publish patches to deal with known CVE problems, and offer several methods help IT administrator or individuals to update. However, without knowing the real challenge that MOI has, it's quite funny that we were doing the updates manually by visiting every user on seat.

Reference


Wednesday, September 2, 2015

Lightweight Directory Access Protocol (LDAP) & Active Directory (AD)

Preface

From a security standpoint, it's better to update your softwares all the time since the old version may have some existing security problems. There's a common name for this kind of hacking which is called "zero-day". Here's how it work: a hacker first scans the versions of softwares you are using, and if he/she found that you're using a older version software, he/she will go find if there's any existing security problem under that version. This is called zero-day since once the vulnerability is release to the public, people have zero-day to fix the problem while all the machines are under threat.

So, to reduce the threat, we keep our software updated. However, there may be tons of computers under one organization, there should be solutions under different platforms to update all the computers correctly, remotely, and efficiently.

Lightweight Directory Access Protocol (LDAP)

Short Description

"LDAP is a directory service protocol that runs on a layer above the TCP/IP stack. It provides a mechanism used to connect to, search, and modify Internet directories. It's based on a client-server model." - MSDN

Information Model (date and namespaces)

It's similar to that of the X.500 OSI directory service, but with fewer features and lower resource requirements than X.500.

API


  • initialize a session (ldap_init, ldap_sslinit)
  • bind to the server (ladp_connect)
  • modify a directory entry, etc.

Distinguished Name (DN)

A DN is a sequence of relative distinguished names (RDN) connected by commas. Typical RDNs are as below:
  • DC: domainComponent
  • CN: commonName
  • OU: organizationalUnitName
  • O: organizationName
  • STREET: streetAddress
  • L: localityName
  • ST: stateOrProvinceName
  • C: countryName
  • UID: userid
So, it looks like: CN=Jeff Smith,OU=Sales,DC=Fabrikam,DC=COM

Active Directory (AD)


"Active Directory is a directory service that Microsoft developed for Windows domain networks and is included in most Windows Server operating systems. An AD domain controller authenticates and authorizes all the users and computers in a Windows domain type network - assigning and enforcing security policies for all computers and installing or updating software. It makes use of LDAP version 2 and 3, Microsoft's version of Kerberos, and DNS" - Wikipedia

To simplify, AD is Microsoft's solution for LDAP, which is designed for Windows environment. And, yes, it's much more complicated on its domain design.

Reference


Web Application Firewall

Preface

This is the first post documenting my studies while working in Ministry of the Interior (Taiwan). Though it's my alternative military service job, I am trying my best to learn from it.

While I was in the warehouse, I found Web Application Firewall (WAF), which is a real device. And, it's my first time to see look into this device, then here's my study on it.

What is WAF?

It's a firewall that applies rules on HTTP conversation (application layer), which is defencing attacks like cross-site scripting (XSS), SQL injection, malicious sources, application layer DoS Attacks, etc.

So, what's the difference between WAF and network layer firewalls (which we use more often)? Network layer firewalls operates at TCP/IP protocol level, which only lookup rules based on IP/port. They don't care about the content in application layer.

Here's an example referring to "Guide to WAF Bypass by SecurityIdiots". The first line is a normal request, and the second is a request with SQL injection. However, the second one is detected by MOD security WAF.
http://bpc.gov.bd/contactus.php?id=4
http://bpc.gov.bd/contactus.php?id=4' UNION SELECT 1,2,3-- -

Detecting WAF

To detect WAF, we can use NMAP like:
nmap -p80 --script http-waf-detect <host> 

Does WAF Work on HTTPS?

Yes or no. Since HTTPS packages are encoded, WAF shouldn't be able to read their contents. However, there are two ways for a WAF to read SSL-protected traffic:
  • The WAF also obtains the private key used by the original SSL server.
  • The WAF runs its own SSL server which is seem and used by the client. And, the WAF would decrypt the traffic first, applies its rules, then forwards it to the original server with SSL-protected.

WAF Vendors / Players

Software (lower cost, but should avoid poor setups)
  • ModSecurity
  • AQTRONIX WebKnight
Hardware (scalability, performance)
  • FortiWeb
  • Barracuda Networks

Reference

Friday, April 24, 2015

Apache Configuration

Preface


Writing Apache config file is required and basic for setting up a new website using Apache. It's easy for basic types of websites since you can find template files online, and only a little modification is needed. However, this turned out that I still don't really know much about how to write the config file even I have set up tons of websites already.

Setting up simple static websites with virtual host, or setting up Wordpress websites is easy. But, if we want to fully and nicely control the permission or setup a Django app would be complex. So, I am writing this article as a note about Apache config files.

Environment

I am using Ubuntu 14.04, so I installed those tools by having following commands:

Then, instead of modifying existing config files, I think it's a better idea to add new files under /etc/apache2/sites-available to extends the setting. For my case, I add "bugkiller.conf" for my new website called Bug Killer.

Also, since in most of the time, I build more than one website on a machine, so "virtual host" became essential setting in my case. This is the way to make Apache gave different outputs based on its domain name.

Case 1. Setup Static Websites (using Virtual Host)

  • ServerAdmin is the email address where receives error logs (or any other logs based on your setting),
  • ServerName and ServerAlias are the domain name for your new website,
  • DocumentRoot is the root directory path of your static website folder
  • For logging, it means that logs at LogLevel "warn", and will be saved in ErrorLog and CustomLog.
And, in order to let the web server process to access the folder correctly, we give the folder all the permission by saying "AllowOverride All".

Case 2. Setup Wordpress Websites (using Virtual Host)

Same as "Case 1".

Case 3. Setup Django Applications (using Virtual Host)


  • WSGIPythonPath: The path for Django project root folder. By setting up this correctly, the server process will know where are those python files locate.
  • WSGIScriptAlias: The path to Django wsgi file, which is a gateway that wires external sockets to our Django project. So, Django should start to work after setting up this path correctly.
  • Directory tag: This part is pretty alike static files, one should give out the permission to read wsgi.py file in order to access the gateway.
  • For static files, Apache server has to handle the since it is not supported when DEBUG=FALSE in Django setting. What we have to do is route the "/static/" requests to our static folder and give out permission for that folder.
  • LogLevel debug: This helped me a lot for debugging, which allowed me to read the setting errors in the default log file (/var/log/apache2/error.log or /var/log/apache2/access.log)

Friday, March 27, 2015

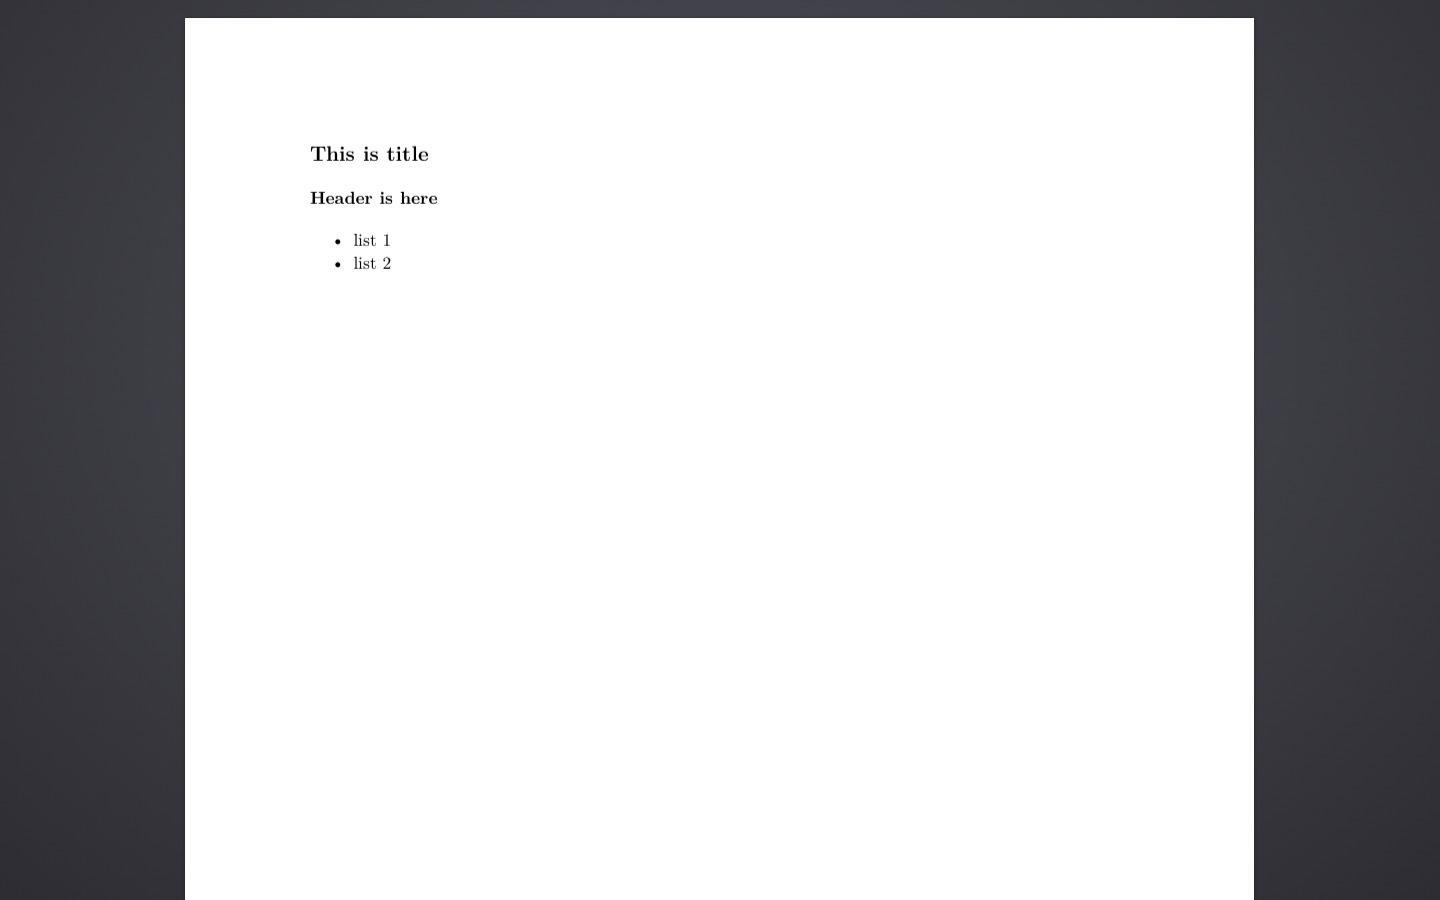
A Fast Way to Generate LaTeX Document using VIM

Finally, I found a fast way to generate a LaTeX document using VIM, which allows me have a basic LaTeX document within few seconds. However, a little background knowledge on MarkDown syntax is required (MarkDown Cheatsheet is here).

Step 0: setup

a. install pandoc

b. add one line of setting into .vimrc (only have to do once)

map \md <ESC>:!pandoc -V geometry:margin=1in % -s -o %<.pdf<CR>:!open %<.pdf<CR>
This is for Mac, if you are using other system, please change "open" to any PDF reader you have on your machine.

Step 1: open a new .md file

vim test.md

Step 2: write some MarkDown and save

## This is title

### Header is here

- list 1

- list 2

Step 3: press following keys in vim: <ESC> \ m d


PDF file will popup automatically

Notice

  • More settings can be passed into pandoc by adding parameters.
  • This is fast way to have basic LaTeX documents, but may not be the most customised way.

Friday, March 20, 2015

Setup Semantic UI

Preface

There are tons of front-end development frameworks, and Semantic UI is one of them. I found it's support more elements than other with complete design. So, I am trying out this time.

Dependencies

There are the things needed to be install before get started:
  • node
  • gulp
    • npm install -g gulp
Other dependencies for Semantic UI:
  • cd <Semantic-UI directory>
  • npm install

Build Framework

So, we can customize our design or change the theme on Semantic UI (not included in this post), then it will generate some CSS and JS files for our website to use.
To generate the files, type: "gulp install"

Reference

Thursday, March 19, 2015

SASS - Helloworld

For people who write CSS may know that it's kind of annoying, SASS and SCSS became the solutions. We've learned some basic SCSS code in Advanced Web Design class today, and it's here.

To compile the SCSS, run "sass --watch ." in the background, and it will update the CSS file constantly.

And, I also asked Prof. Twigg which one should I go with as a beginner, SASS or SCSS. He said SCSS, which is newer.

Monday, March 16, 2015

Eclipse + Vim = eclim

Preface

As a vim lover, I am having a bad time writing Java code on Eclipse, where I am not familiar with the shortcuts to switch between files or jump the cursor to places I want. So, I am now trying to write my Java assignments on Vim using eclim plugin, which should fully support the features I used on eclipse.

Installation

Original tutorial: here
  • Install required softwares
  • Setup Vim (.vimrc)
    • set nocompatible
    • filetype plugin indent on
  • Install eclim.jar
    • file is here
    • install: java -jar eclim_2.4.1.jar

Usage

There are two ways to start eclim daemon (required):
  1. manually run eclimd under eclim directory
  2. open eclipse and "Window ‣ Show View ‣ Other ‣ Eclim ‣ eclimd" (I think this method is better to start with since you can still view/share the workspace with opening eclipse)

Then, I think one can refer to Eclim Cheatsheet for remaining usages.